How to Crochet: A Stretchy Ribbed Brim
I’ve created this simple tutorial to show you an easy way to crochet a ribbed brim on a hat.
If you can make a half double crochet stitch, you can do this!

Have you ever struggled with crocheting a nice brim on a hat?
Or maybe you’ve finished a hat, tried it on and realized the brim is too tight?
Fear not! I am here to save the day!
(You really need to picture me standing with a crochet superhero cape on, hands on my hips, while dramatically announcing that statement…)
In this tutorial I’m going to teach you a simple way to do a ribbed brim on a hat. And you can apply this same technique to any crochet project where you’d like to add ribbing.
It’s easy and I love the way it looks and the way it feels.
For this tutorial, you’ll need:
A 5 mm (H) hook and worsted weight yarn
OR 6.5 mm (K) hook with bulky yarn
Choose a yarn that isn’t too fuzzy or too stiff
Choose a yarn that easily shows stitch definition.
For this tutorial, I’ll be using shortform at times:
Hdc = Half Double Crochet
Fphdc = Front Post Half Double Crochet
Bphdc = Back Post Half Double Crochet
St = Stitch
Let’s get started!
Grab your hook and your yarn and follow along with me in this step by step tutorial.
This stitch is simply a hdc stitch, but instead of inserting your hook through the V’s of the stitch from the previous row (like a normal hdc st), you’ll be inserting your hook into a different part of the stitch.
It’s that simple!
In my crochet patterns I write this stitch as “fphdc” and “bphdc” and then note that actually I use a modified version of this stitch and I link to this tutorial. You can crochet traditional fphdc or bphdc stitches instead and the pattern will turn out just fine. But by modifying it, we’re creating stretchier stitches that don’t feel so bulky. In other words… we’re doing it a better way.

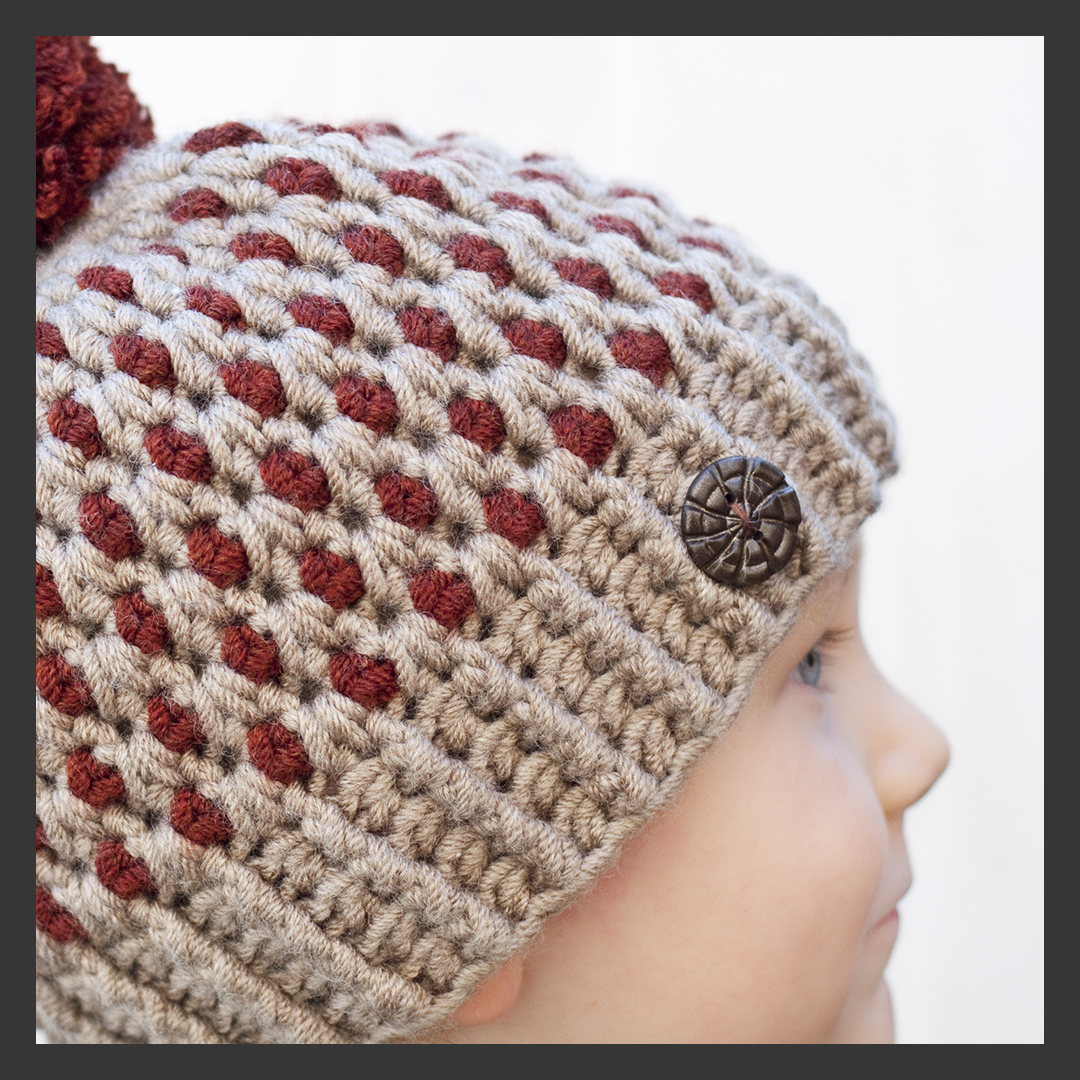
I thought it would be helpful for you to see what the ribbing looks when applied to an actual hat.
You can change the order of the stitches to create a different look. Take a look at the images below to see what I mean.

1 x 1 ribbing crocheted with a worsted weight yarn.
In the pattern it would read like this:
“(fphdc next st, bphdc next st) repeat until end of round”.
(Hat pattern shown is my Falling Skies beanie, pattern coming soon.)
1 x 1 ribbing (same as above) worked with a bulky weight yarn. It’s easier to see the stitches with a thicker yarn.
(Hat pattern shown is my Speckled Ridge beanie, pattern coming soon.)

2 x 2 ribbing with worsted weight yarn.
In a pattern it would read like this:
“(fphdc in the next 2 sts, bphdc in the next 2 stitches) repeat until end of round.”
(No pattern for this hat shown.)

This ribbing is 1 fphdc, followed by 2 bphdc, worked in bulky yarn.
In the pattern it would be written like this:
“(fphdc in the next st, bphdc in the next 2 sts) repeat until end of round.”
(Hat pattern shown is my Northern Lights Beanie.)
Let’s get started!
In this tutorial I will teach you how to crochet these stitches in the round.
You’ll be creating a 1x1 ribbing. You will crochet (FPhdc, BPhdc) (FPhdc, BPhdc) and so on.
Grab your hook and yarn and chain 30 or more stitches and slip stitch to first chain to join the round. Careful not to twist your work.

Round 1:
Crochet a round of hdc sts, making 1 hdc st in each chain st from the previous round.
Slip stitch to top of first half double crochet to join the round.
Round 2:
Chain one to start the round.
Instead of working into the first stitch, you’ll be crocheting around this post here.
Working UNDER the “V” stitches that sit across the top of your work.
Remember, this stitch is still a half double crochet stitch, but you are just inserting your hook in a different place.

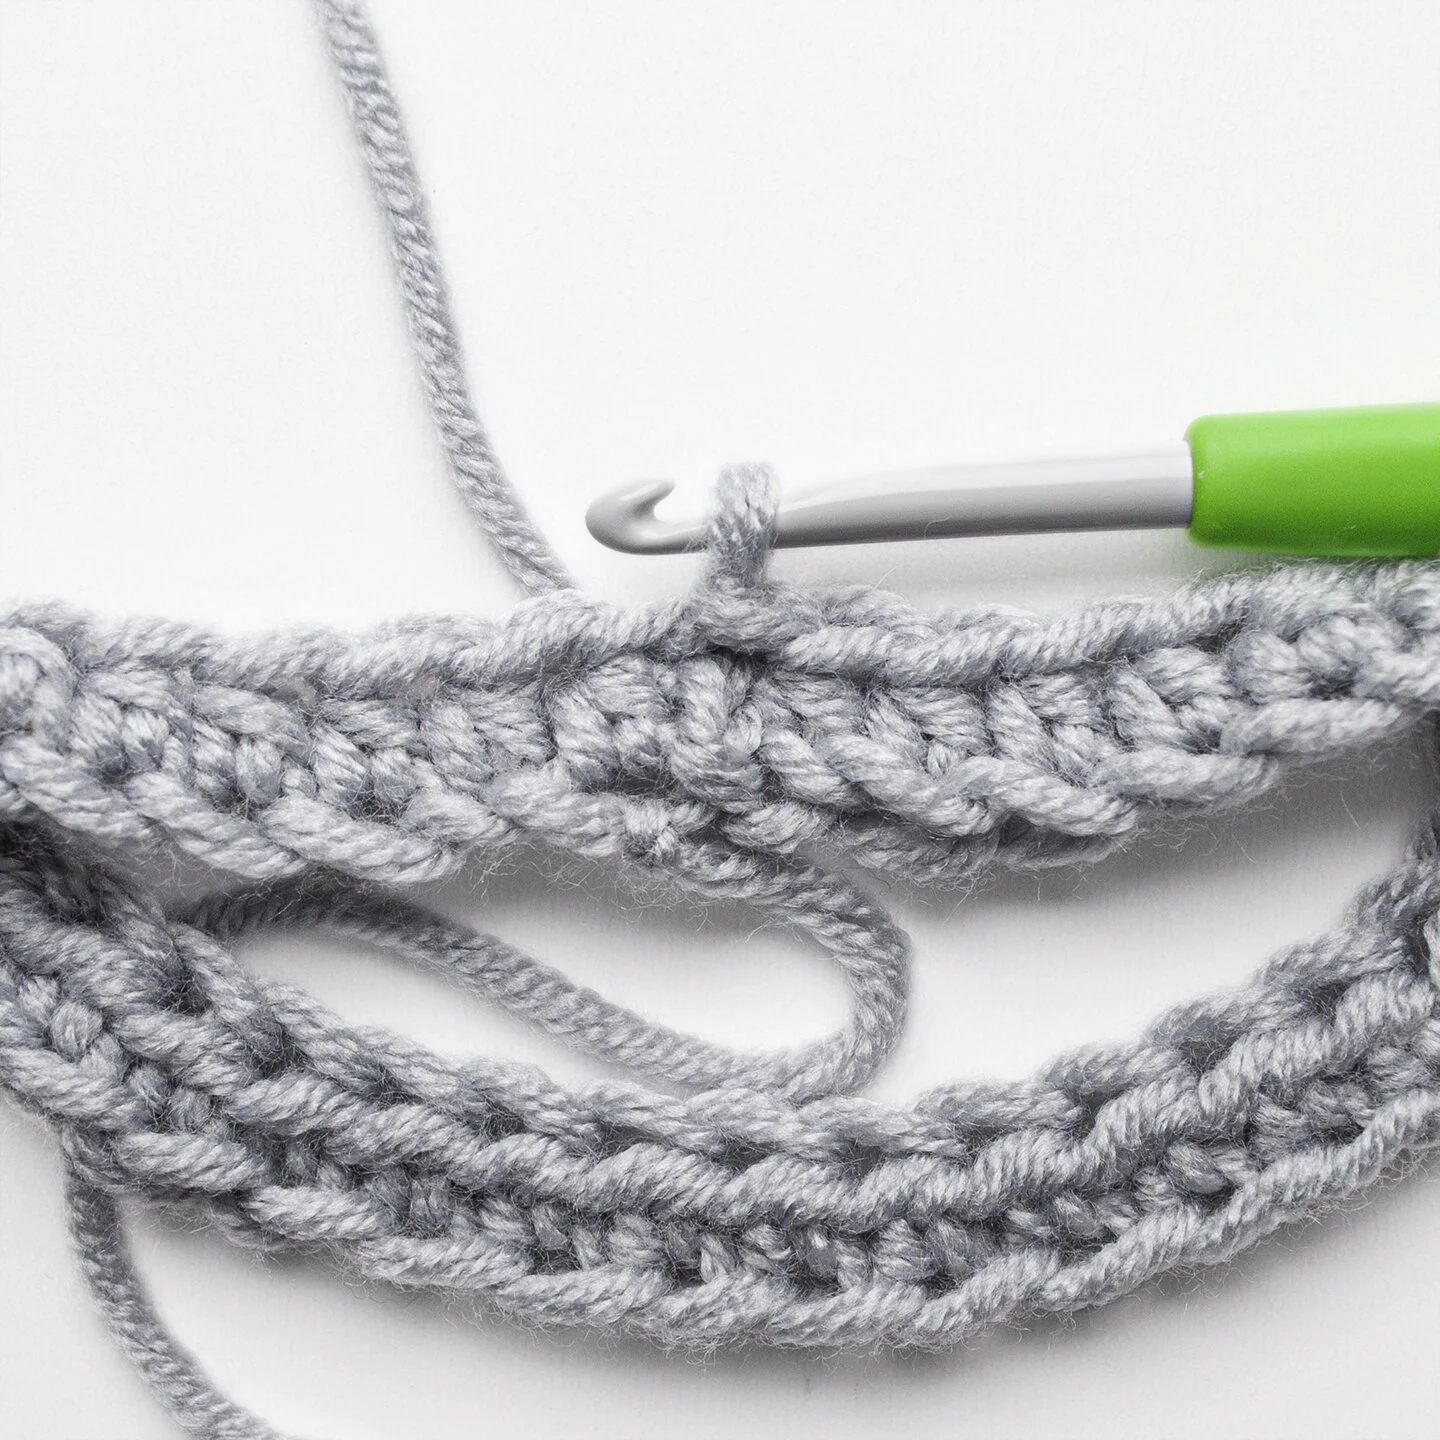
To start you’ll crochet a FPHDC (front post hdc).
Yarn over (as you would for a regular hdc stitch).
Working from the FRONT of your work, insert your hook beside the yarn post, going behind it and back out to the front of your work. Trapping the yarn post on your hook, as shown in this photo.
Remember you are working UNDER the V stitches that sit across the top of your work, not through the stitches.

Yarn over again (once again, the same as you would when working a regular hdc stitch.

Pull yarn back under yarn post and to the front side of your work.
You should now have 3 yarn strands on your hook.
And your stitch should be attached to the yarn post that you worked around in the previous step.

Yarn over once again and pull hook with yarn back through all 3 loops on hook.

Front post hdc stitch complete!
Your stitch should feel like it is sitting like a bump on the front of your work. This will be more noticeable as you continue on creating more stitches.

You’ll now crochet a back post hdc.
You’ll be crocheting around the next post from the previous round.

Yarn over (as you would for a regular hdc stitch).
Working from the BACK of your work, insert your hook beside the yarn post, going in front of it and back out to the back of your work. Trapping the yarn post on your hook, as shown in this photo.
Remember you are working UNDER the V stitches that sit across the top of your work, not through the stitches.

Yarn over again (once again, the same as you would when working a regular hdc stitch.

Pull yarn back under yarn post and to the back side of your work.
You should now have 3 yarn strands on your hook.
And your stitch should be attached to the yarn post that you worked around in the previous step.

Yarn over once again and pull hook with yarn back through all 3 loops on hook.

Back post hdc stitch complete!
Your stitch should feel like it is sitting like a bump on the back of your work. This will be more noticeable as you continue on creating more stitches.

Continue working FPhdc and BPhdc stitches for the entire round.
Fphdc, Bphdc, Fphdc, Bphdc and so on.
At the end of the round make sure to count your stitches. It can be easy to skip a stitch while crocheting these rounds.

On your next round, chain one to start the round.
Then FPhdc in the first stitch, the same as you did in the previous round.

To crochet the front post hdc stitch, yarn over, insert your hook around the yarn post from the FRONT of your work, yarn over and complete the hdc stitch as usual.

You should now have your newly formed front post hdc stitch lining up with the one below it, forming a ridge along the front of your work.

Your next stitch will be a back post hdc.
Yarn over, insert your hook around the yarn post from the BACK of your work, yarn over and complete the hdc stitch as usual.

Continue working your FPhdc and BPhdc stitches for the entire round. Making sure that the ridges made up by the stitches line up with the previous round.

Feel free to work rounds of FPhdc and BPhdc until you get the hang of it. The more rounds you work, the more clearly you will be able to see the lines of ridges forming

And that’s it! I hope you’ve enjoyed this tutorial!
You can adapt most patterns that call for FPhdc or BPhdc stitches and use this modified version instead.
Kindest regards,
Amanda Foster
I’ve linked to certain products within this tutorial. If you click and then purchase one of the products, I will earn a small commission. The awesome thing is, the commission doesn’t come out of your pocket, it’s paid to me by a big company. I would never recommend a product to you unless I think it is valuable. Every item I recommend in this tutorial is something I personally use.
Amanda Foster and This Crochet is a participant in the Amazon Services LLC Associates Program, an affiliate advertising program designed to provide a means for sites to earn advertising fees by advertising and linking to amazon.com